
This is a regular blog post. Looking for show notes or links to show audio? Check out the other posts.
This morning, I headed to Randolph Air Force Base near San Antonio, Texas. There’s a locker in the life support equipment room there with a helmet, mask, harness, and gee suit.
The locker is labeled “Mr. Tupper.” (Too stinking cool!)
Long story short, I just got a ride in the mighty T-6A Texan II with Maj Jarrett Edge of the 559th Flying Training Squadron at Raldolph.
I’ll post more as I gather in the pictures and video that Jo Hunter of Futurshox and Will Hawkins of Wilco Films shot during the process. We got great images in both cases and I’m very excited about the processof putting together both audio and video episodes covering the experience.
For now, I have the pictures pretty well organized from yesterday, so let’s talk about that.
I spent yesterday morning getting the training and fitted for the ride. The initial phase involved spending an hour or so with Reynaldo (“Ray”) Gutierrez.
I brought my own flight suit and boots. (Yeah, that’s the mark of a real aviation fanboy – “Ray, he brought his own zoom bag . . .”) All I needed to do was pull my Civil Air Patrol patches and cut the rank off of my shoulders.
By the way, if Civil Air Patrol aircrew members meet the Air Force height, weight, and grooming requirements, they can wear Air Force issue Nomex flight suits – Yet another reason to join CAP if you’re not a member already!
Then it was time to get familiar with the gear. Ray hooked me up with a gee suit and harness and taught me where and how everything connects. Then the helmet and the face mask. A quick tour of the seat kit (a small bag of vital survival stuff with an emergency beacon, a UHF radio, flares, and the like), and then it was time to meet the hardware.
First stop was the seat. It’s a full mock-up of the ejection seat and it’s used to familiarize the pilot with the straps, garters, and other stuff that makes you a part of the aircraft. It’s really necessary because you have seven buckles holding you in or holding onto the stuff that’s attached to you. Then you have your oxygen and your gee suit connection.
After you understand the hook-ups, you need to understand how the ejection system works. I flew with the safety pin in my ejection seat so I couldn’t inadvertently pull the handle. I could still remove the pin and punch out if Maj Edge in the front were to become incapacitated, but only then. Generally, the drill was that, if we were going to bail out, he’d announce “bail out, bail out, bail out!” and I’d simply assume the position (head back, chin in, elbows in, feet on the rudders) and prepare for the ride.
Here, I’m demonstrating for Ray that I understand the correct position for bailout. In this case, I’ve pulled the pin and I’m pulling the handle and punching out.

Next is the egress trainer. If bad things happen on the ground, you have to know how to get out of the aircraft in a hurry. You learn the operation of the canopy first and demonstrate that you can get out. Then you go into more detail, including the possibility that you might have to eject on the ground, shatter the canopy to get out, or otherwise egress in nonstandard ways.
You don’t unstrap until you’re sure that the canopy won’t open. Unstrapping basically eliminates your ability to eject and you don’t want to abandon that option until you’re sure that there’s no hope of ejecting. The T-6A is rated for zero-zero ejection, which means that you can punch out right there on the ground and still get a full canopy deployment and decent chance at a survivable landing. Ideally, you don’t want to eject unless you’re at least 6,000 feet AGL in an uncontrolled ejection or 2,000 feet AGL in a controlled ejection. But the aircraft will give you the ejection option under lots of circumstances and you don’t give that away until you know that ejection isn’t an option.
Anyway, I completely strap in and put on the helmet, gloves, and oxygen mask. Ray closes the canopy and talks to me over the headset. He tells me that there’s a fire in the cockpit and “egress, egress, egress.” I get the canopy open, unhook myself (two harness points, one lap belt point, two seat kit points, and two leg garter points. Then I stand up with authority and all of the hoses and other stuff tears away so I can get out.
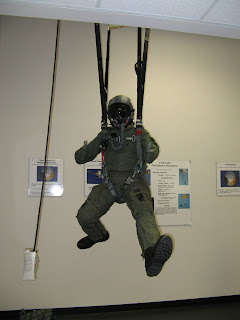
Then comes the dangle. Ray goes over the parachute. What it’s supposed to do, what it looks like, how to use the toggles, and how to deal with malfunctions. It covers everything from line twists to how to land (toggles at eye level, eyes on the horizon, knees bent, toes down and just wait for contact). The idea is not to flare or otherwise pay attention to the landing, other than to assume the proper attitude and just wait for it.
And this isn’t just a stand-there-and-listen exercise. The facility has two hoists with parachute risers on them. Ray connects the risers to my harness and hoists me up off of the floor. I get to demonstrate what I’ve just learned while hanging in the harness.
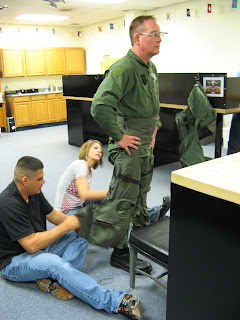
After that, it’s on to life support. I’ve used generic equipment thus far in the training, but now it’s time to fit me for the harness, gee suit, and other equipment that I’m actually going to wear. The gee suit (“speed jeans” in the parlance of some) is basically a pair of high-waisted Nomex pants with air bladders around the calves, thighs, and midsection. It gives you a squeeze and helps you to strain against the gee forces in flight to maintain good consciousness.
The T-6A is rated for a fairly high gee load, but it’s generally not flown out to high gees like the F-16. For that matter, although it is pressurized, it’s generally not flown at really high altitudes that would require an oxygen system. But I think that it’s good that this aircraft allows you to become intimately familiar with all of the life support systems that you’d find in the Viper, the Eagle, etc. And I’m certainly not going to argue with a big hug around the lower body when I experience acceleration four times what I’m accustomed to.

Then comes the harness, helmet, and mask. The mask is probably the next most important system. Even if you’re not going to depend on the mask because of a thin atmosphere (the cabin is pressurized to 8,000 feet with normal max of 3.6 psi and a bleed-off point of 4.0 psi.), you are going to have it strapped onto your face and it’d be darned inconvenient if it didn’t seat properly or didn’t give you a good flow of air.
Once it’s sized, you walk over to a machine that allows you to test the airflow, seal, and audio connections. It looks for all the world like one of those vacuum tube testers that I used to see in TV and appliance stores when I was a kid. But it’s vital to make sure that everything is working. You don’t launch and fly the airplane around the edges of its envelope with malfunctioning equipment. Lots of things can scrub a flight like this and it’s important to go through all of the testing right there where you have a dedicated staff of people who can fix what’s broken and swap out what they can’t fix.
At the conclusion of the process, they put it all in a locker in the life support room. Locker 240. And put my name on it. Avery nice tough.
The flight itself went very well and I’ll give some detail on that once I get the pictures in. And I’ll probably head into the studio to cut some original music for the episode that covers the flight. I’m also thinking about shooting video in the studio during recording and making a music video out of it. Ought to be fun!
Anyway, it’s off to get the video offloaded and do a few more things before hitting the sack. Watch for a lot more on the show and here on the blog about this great ride!
